Its been awhile since I have updated since I have updated the world on My fiat X19. Although I currently dont have pictures, I will add them later.
here is a list of what has been done over this winter/spring:
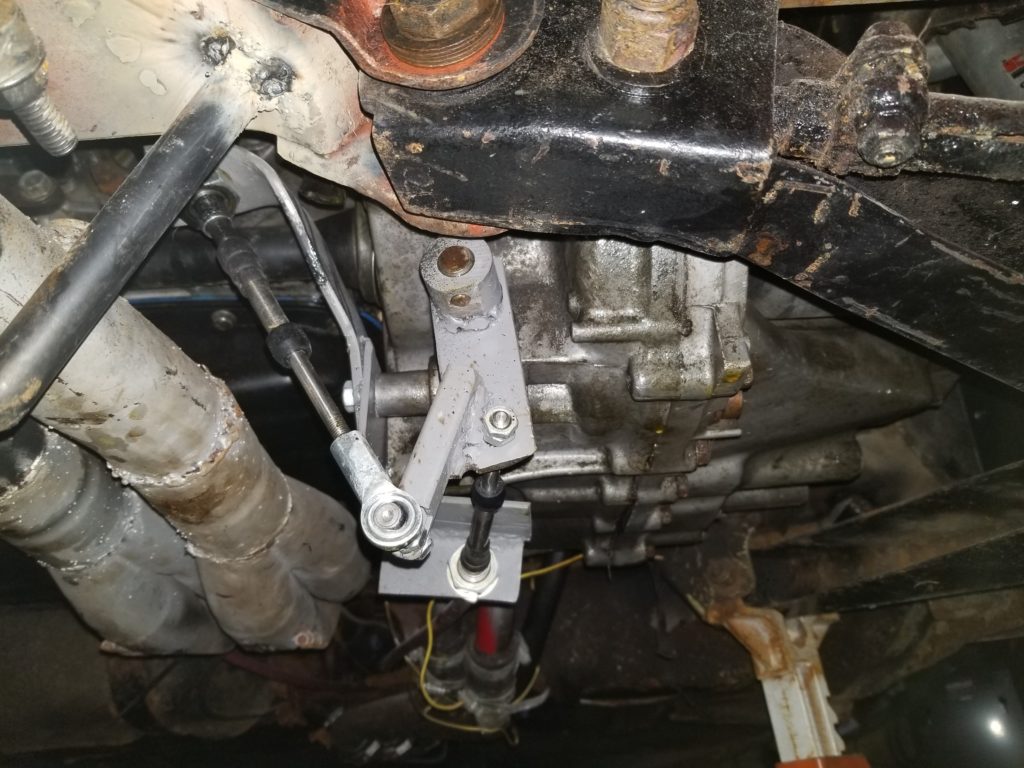
- Shift linkage converted from rod to cable
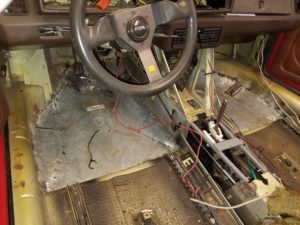
- New floor pans
- Cooling system fixed
- New 15×8 wheels with tires have been fitted
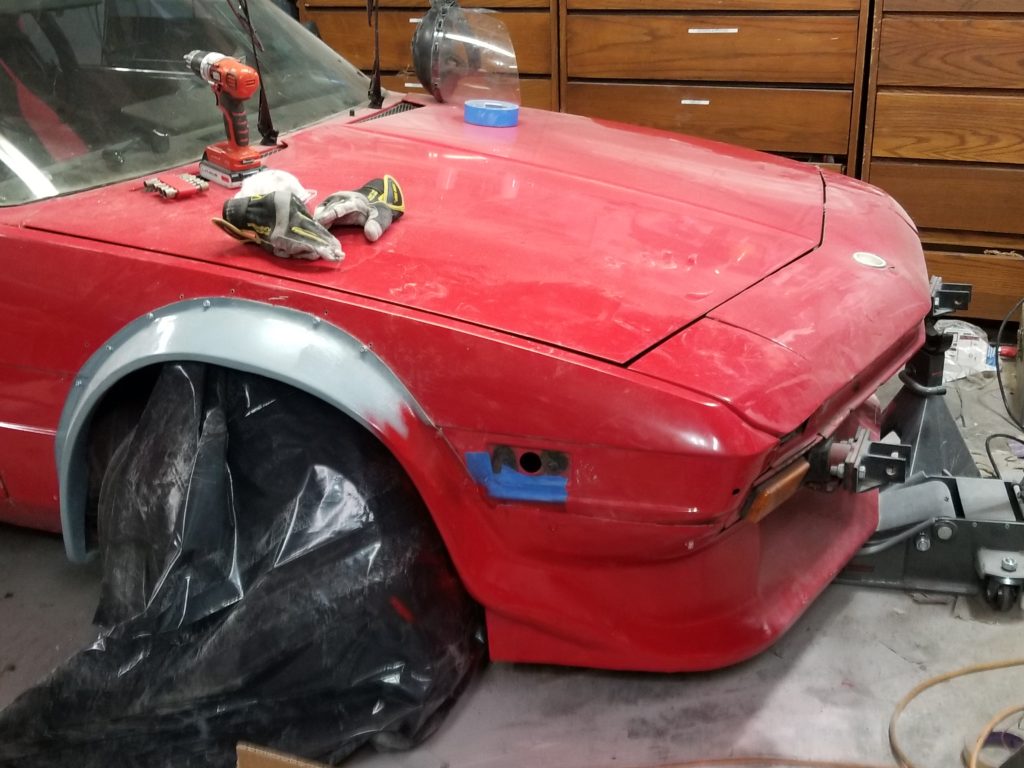
- Fender Flares have been added
- New carpet has been added
- New Digital Dashboard has been configured and fitted
- new throttle cable path
- oil pressure gauge
- wide band O2 Guage
So here we go one at a time.
first, this got smartly moved from a shove it and get it done to adding yet another winter to it. It was a great move as I started to half ass things and there was quite a bit more I did over the winter I may never have done. So I was almost ready to drive the car last summer, I even insured it for more than storage. Well I have a slight issue. It was over heating (215 and climbing when I shut it down). Feeling the radiator, I could tell the coolant wasnt circulating through. this is when my friends said stop. move it to another winter project. so I did. this is what happened this winter.
Shift linkage converted to cable from rod. I was not happy with the sloppyness of the shift linkage. I tried to modify the rod to get it to feel better with no avail. I think the distance and the reversing of it just wasnt going to be tight enough. So I started out trying to think of how I could fix it. I know the People who are putting the K series in the X love the shifting of the cable shifter so I started to see if I could get a cable shifter for a B series. During that search, I found a great video on how people are using Subaru engines midship. Subbie transmissions are rod shifter transmissions. What they were doing is converting it to cable. Once I saw the video I was sold. basically. a cable shifter uses 2 cables. 1 for the front to back movement, 1 for left to right. how that converts to the rod it actually quite simple. picture a piece of metal connected to the rod shooting off 2 inches or so like a flag. the front to back cable attaches to it near the rod. now when the cable goes out, it pushed the rod out. when it is pulled, it pulls the rod back in. the rotation of the rod the subbie people did it with bell cranks, I followed a 914 conversion page ans ran the cable around. so when you move the shifter left, it pulls the cable, in turn the cable, with is connected to the flag pulls the flag causing the rod to rotate.

What I used was a porsche boxster shifter. Funny, on ebau it was about $75 buck. the Honda cable shifter was about $200! Hindsight, about 2 weeks after I bought the porsche shifter and tore up my tunnel to install it, Midwest Bayless offered a cable shifter that bolts into the X for the K swap, but it would have worked in my case. Ugh. It shifts smooth as butter. I am going to redo the flag part as right now it hangs too low. But that is for another day.
Floor pans. yeah, I really didnt have floor pans. Dale and I “fixed” them before, well I did a quicky hack job so my feet werent hitting the ground. I bought a set on ebay (later found out they were located about an hour from me and I could have just picked them up) and welded them in. no big story, it was easy peasy.

Back to fixing the cooling issues. new thermostat, added a secondary filler neck and vent to help get the air out, found out I have the hoses backward, replaced the tubes under the car, new aluminum radiator, new head gasket, new water pump. Ugh. and it still was over heating. I hit up honda-tech.com and they had 2 suggestions. 1. swap the heater return and the bypass return. this way the bypass return hits the thermostat more direct, rather than the heater return. 2. use a Honda genuine thermostat. Well, between the 2 things, it works!!! I still have to hook up the cooling fans, but at least now the radiator gets hot so I know I have circulation. the final cooling diagram:
Deleted diagram. It was wrong. I finally got is working correctly and will add a diagram when I have time.
Generically. main circuit. out of head to new filler neck, to top of radiator, out of bottom of radiator, back towards engine, tee to expansion tank bottom only inlet, bleed valve before thermostat highest spot, then to thermostat then h2o pump. Heater Circuit, out from head backnto return line second one from thermostat. I bypassed the heater for now. Bypass, from head to return line closest to thermostat.
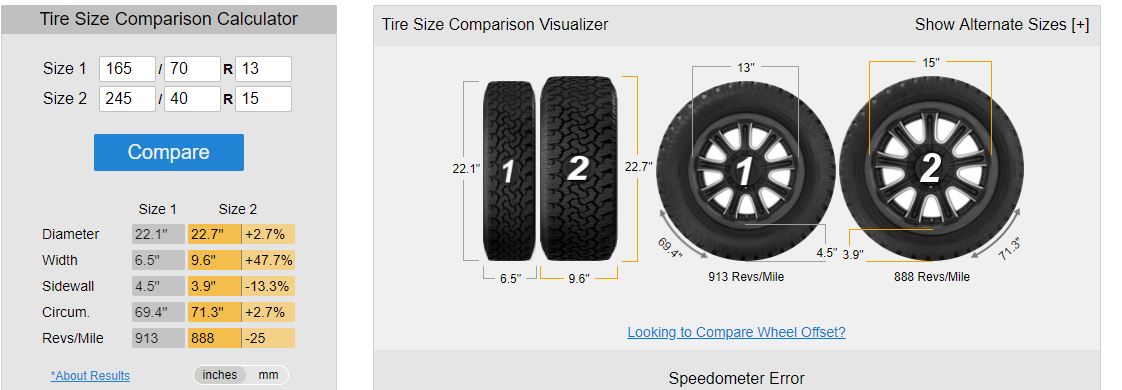
New Wheels and tires. 13 inch tires are getting harder and harder to find, let alone performance ones. So I decided to upgrade to 15’s. Vicks auto had a set of 15×8 with 0 offset. I liked the look so I picked them up. now for the issues. 15×8 with 0 offset will not fit with stock struts. I really didnt want to get coilovers (yet) so I opted for a 1/2 spacer front and rear with the appropriate hub centric conversion built in. now the wheels fit without hitting it was time for tires. the right size to fit under the fender easily would be 195/45r15. well, that is a bit of a stretch on 8 inch. 2 others have 205/50 front and 225/45 rear. both have flares. my thought was I wondered if 225/45 will fit up front. I bought 2, figuring if they didnt fit up front, I would buy 205’s for the front and put these in the rear. If they did fit, then I would buy 245/40r15 for the rear and keep the 225’s up front. after ALOT of massaging/trimming of the fender, the 225’s fit! So I ordered the 245’s for the rear. I also got myself ready knowing I needed flares.
stock vs new rear…… (width: 6.5 inch to 9.6 inch…)

Now for the flares. there are a few styles available for the X19. Baylees, Faza, and PBS. there are also 2 popular full fender kits, Dallara and Boig. I like the full kits, but they are 3-4 times the cost and work to get installed. I decided on Brayden’s choice from midwest. Brayden mixed Faza Front with PBS rear. took a trip to pick them up. (love midwest bayless) when I went to put the fronts on, we had an issue. the 225’s rubbed on the front and rear when I turned. After some thinking, I decided that I would just stretch the, a little by cutting them at the top, spreading them about 2″ then refberglassing them together. Poof, it worked and the wheels can turn. I think if I didnt go with the spacers, it might have had the turning radius fine for the flares. I also molded them in (real rough) to the airdam as the airdam I have isnt the one that is supposed to be with the flares.

the Dashboard. my original idea was to modify the stock dash to maintain the look of the original, just having new gauges that would be able to read the honda info. here is what I found. tach would work with a few mods, h2o gauge would work, amp would work. so far so good. Speedo would be a GPS unit, oil idiot light worked. I really wanted more info than that. so I picked up a RD-1 digital dash. fully customizable and works with my ECU. now I have almost every reading I want. bought a used instrument panel so I didnt have to kill mine, and made the digital dash fit in it. I also added a few idiot lights I would need. Brights indicator, Turn signal indicator, oil light, amp light. well I got the turn signal and the brights indicator working. the oil and the amp, not so much. oh well. I wanted a separate oil pressure gauge anyway. I also picked up a wideband O2 gauge that will help when I go to tune it.
lastly for this update. the throttle cable. Last summer I actually drove it with a jenky throttle set up. stock fiat to the engine compartment, bastardized connection to the honda throttle cable. This would not do. I bought a 110″ dune buggy cable, some stainless (ok, it turned out not to be stainless, not happy here) tubing. now I have a single cable from the pedal to the throttle body. I use the tube to direct it around the engine up to the manifold where it can be adjusted.
well that is all for now. Lunch is over.